Django’s Generic Views: DetailView
Continuing from my previous post on Django’s generic ListView, this article will instead cover the available customisation of the DetailView. Some options (like ordering and pagination) aren’t available for this view, but there are a few others that are different.
As a reminder, the site Classy Class-Based Views is an invaluable resource for understanding Django’s class-based views.
Posts in this series
ListViewDetailView(this post)
Let’s assume a single model:
class Post(models.Model):
    title = models.CharField(max_length=255)
    created_at = models.DateTimeField(auto_now_add=True)
    published_at = models.DateTimeField(null=True)
    is_featured = models.BooleanField(default=False)
    title_slug = models.SlugField()
We’ll cover the following attributes, if you want to jump straight to each section:
template_namecontext_object_namequerysetget_queryset()pk_url_kwargslug_fieldslug_url_kwargextra_contextget_context_data()get_object
The Simple DetailView
At its most basic, Django’s DetailView will render a template with the details of a particular instance from a specified model. In our case, a single Post object.
from django.views.generic import DetailView

class PostDetail(DetailView):
    model = Post
A template named post_detail.html is expected, and it will be handed a variable named object which is a single Post instance. A template variable named post (derived from the model name) is also available, pointing to the same object. The object will be looked up in the Post model by the primary key fetched from the pk URL parameter.
Because the DetailView is designed to look up an object based on the URL, it has to be wired up to a URL pattern with a parameter, such as:
path("/posts/<int:pk>/", PostDetail.as_view(), name="post-detail")
But my template is called single_post.html!
Then update the template name that DetailView looks for:
class PostDetail(DetailView):
    model = Post
    template_name = "single_post.html"
In my template, I use single_post not object!
You can change the template variable name that DetailView sets:
class PostDetail(DetailView):
    model = Post
    template_name = "single_post.html"
    context_object_name = "single_post"
Without this, the instance is available as either object or post (the second derived from the model name).
Posts that aren’t published shouldn’t be visible!
Specify the base QuerySet that DetailView is using:
class PostDetail(DetailView):
    template_name = "single_post.html"
    context_object_name = "single_post"
    queryset = Post.objects.exclude(published_at__isnull=True)
Now even if you’ve got a URL with a valid primary key in it, the user will see a 404 if it’s not published.
Notice that we don’t need to specify the model anymore, but because we don’t, the default variable of post is no longer available to the template.
Future posts shouldn’t be visible, either.
You can’t do that with a class attribute (fetching the current time requires some runtime code, not compile-time code), but the DetailView still has you covered:
class PostDetail(DetailView):
    template_name = "single_post.html"
    context_object_name = "single_post"

    def get_queryset(self):
        now = timezone.now()
        return Post.objects.filter(published_at__lte=now)
Future-dated posts will now return a 404.
My URL parameter isn’t called pk, it’s post_id
Change which parameter the view is looking for:
class PostDetail(DetailView):
    template_name = "single_post.html"
    context_object_name = "single_post"
    pk_url_kwarg = "post_id"

    def get_queryset(self):
        now = timezone.now()
        return Post.objects.filter(published_at__lte=now)
I want to use slugs in the URL, not primary keys.
That’s actually supported out of the box, as long as your slug field is called slug and your URL parameter is also called slug:
path("/posts/<slug:slug>/", PostDetail.as_view(), name="post-detail")
My slug field is called title_slug.
Oh, your URL pattern is like this, instead?
path("/posts/<slug:title_slug>/", PostDetail.as_view(), name="post-detail")
Tell that to the view:
class PostDetail(DetailView):
    template_name = "single_post.html"
    context_object_name = "single_post"
    slug_field = "title_slug"

    def get_queryset(self):
        now = timezone.now()
        return Post.objects.filter(published_at__lte=now)
The URL parameter for the slug is also called title_slug.
Don’t worry, the view can handle that too:
class PostDetail(DetailView):
    template_name = "single_post.html"
    context_object_name = "single_post"
    slug_field = "title_slug"
    slug_url_kwarg = "title_slug"

    def get_queryset(self):
        now = timezone.now()
        return Post.objects.filter(published_at__lte=now)
I need extra data in the template.
Just like the most generic class-based views, the DetailView allow the passing of extra data to the template:
class PostDetail(DetailView):
    template_name = "single_post.html"
    context_object_name = "single_post"
    slug_field = "title_slug"
    slug_url_kwarg = "title_slug"
    extra_context = {"section": "blog"}

    def get_queryset(self):
        now = timezone.now()
        return Post.objects.filter(published_at__lte=now)
My extra data isn’t static, though.
Again, not limited to the DetailView, adding complex extra data to the template context is easy:
class PostDetail(DetailView):
    template_name = "single_post.html"
    context_object_name = "single_post"
    slug_field = "title_slug"
    slug_url_kwarg = "title_slug"
    extra_context = {"section": "blog"}

    def get_context_data(self, *args, **kwargs):
        context = super().get_context_data(*args, **kwargs)
        context["featured_posts"] = Post.objects.filter(
            is_featured=true
        ).order_by("-published_at")[:5]
        return context

    def get_queryset(self):
        now = timezone.now()
        return Post.objects.filter(published_at__lte=now)
My objects don’t come from models!
DetailView can handle that too! Throwing out everything I’ve said above about the Post model and querysets, you can override get_object and return whatever you need:
class PostDetail(DetailView):
    template_name = "single_post.html"
    context_object_name = "single_post"

    def get_object(self, *args, **kwargs):
        slug = self.kwargs.get("title_slug")
        try:
            return fetch_post_from_api(slug=slug)
        except APIError:
            raise Http404("Post not found")
Django’s Generic Views: ListView
Django’s class-based views are very divisive; some people swear by them, others won’t touch them with a barge pole and will stick entirely to function-based views. I’m not going to weigh in on that debate, but one thing I do think is that Django’s documentation around their generic class-based views is not particularly great. There are no tutorials that show you how to use them, and only reference pages that list some of their properties without any real guidance on what they do.
This post is going to focus on one of the most basic generic class-based views, and one that is reached for first by a lot of new-to-Django developers, the ListView. Starting from the simplest possible use, we’ll walk through various options on how to customise its behaviour.
An excellent resource for diving deep into Django’s class-based views is Classy Class-Based Views, which I highly recommend having a look through when you’re ready to start piecing together how class-based views work under the hood.
Posts in this series
ListView(this post)DetailView
For the purposes of this post, we’re going to assume a single model:
class Post(models.Model):
    title = models.CharField(max_length=255)
    created_at = models.DateTimeField(auto_now_add=True)
    published_at = models.DateTimeField(null=True)
    is_featured = models.BooleanField(default=False)
We’ll cover the following attributes, if you want to jump straight to each section:
template_namecontext_object_nameorderingquerysetget_queryset()paginate_byextra_contextget_context_data()
The Simple ListView
At its most basic, Django’s ListView will render a template with a list of instances of a particular model. Just two lines (beyond the import) is enough to get this functionality:
from django.views.generic import ListView

class PostList(ListView):
    model = Post
A template named post_list.html is expected, and it will be handed a variable named object_list which is a QuerySet of all Post instances.
But my template is called all_posts.html!
Then update the template name that ListView looks for:
class PostList(ListView):
    model = Post
    template_name = "all_posts.html"
In my template, I use posts not object_list!
You can change the template variable name that ListView sets:
class PostList(ListView):
    model = Post
    template_name = "all_posts.html"
    context_object_name = "posts"
Without this, the list is available as either object_list or post_list (the second derived from the model name).
I need the posts to appear with the most recent first!
Define what order is used by the QuerySet:
class PostList(ListView):
    model = Post
    template_name = "all_posts.html"
    context_object_name = "posts"
    ordering = "-published_at"
Posts that aren’t published yet are still appearing!
Specify the base QuerySet that ListView is using:
class PostList(ListView):
    template_name = "all_posts.html"
    context_object_name = "posts"
    ordering = "-published_at"
    queryset = Post.objects.exclude(published_at__isnull=True)
Notice that we don’t need to specify the model anymore.
What if I want to also exclude posts that have been set to publish in the future?
You can’t do that with a class attribute (fetching the current time requires some runtime code, not compile-time code), but the ListView still has you covered:
class PostList(ListView):
    template_name = "all_posts.html"
    context_object_name = "posts"

    def get_queryset(self):
        now = timezone.now()
        return Post.objects.filter(published_at__lte=now).order_by("-published_at")
Note that providing a QuerySet this way will ignore both the queryset and ordering attributes mentioned above, which is why we’ve included the ordering directly in the get_queryset method now. You can call super().get_queryset() if you want to use those attributes and just adjust the query set after, though.
Too many posts are showing up! I only want ten.
Add pagination:
class PostList(ListView):
    template_name = "all_posts.html"
    context_object_name = "posts"
    paginate_by = 10

    def get_queryset(self):
        now = timezone.now()
        return Post.objects.filter(published_at__lte=now).order_by("-published_at")
The Pagination docs are a great place to see what’s required in the template.
I need extra data in the template.
This is not limited to the ListView, but most generic class-based views allow the passing of extra data to the template:
class PostList(ListView):
    template_name = "all_posts.html"
    context_object_name = "posts"
    paginate_by = 10
    extra_context = {"section": "blog"}

    def get_queryset(self):
        now = timezone.now()
        return Post.objects.filter(published_at__lte=now).order_by("-published_at")
My extra data isn’t static, though.
Also not limited to the ListView, adding complex extra data to the template context is easy:
class PostList(ListView):
    template_name = "all_posts.html"
    context_object_name = "posts"
    paginate_by = 10
    extra_context = {"section": "blog"}

    def get_context_data(self, *args, **kwargs):
        context = super().get_context_data(*args, **kwargs)
        context["featured_posts"] = Post.objects.filter(
            is_featured=true
        ).order_by("-published_at")[:5]
        return context

    def get_queryset(self):
        now = timezone.now()
        return Post.objects.filter(published_at__lte=now).order_by("-published_at")
This may become a series of posts working through the different generic class-based views that Django provides, but I will make no promises! For now, this should suffice as a quick reference for those wanting to easily customise the behaviour of ListView without reinventing the wheel.
Pendulum 1.18 Released
A new version of Pendulum is out—version 1.18 is now available in the App Store! This brings with it one main feature: custom stationery.
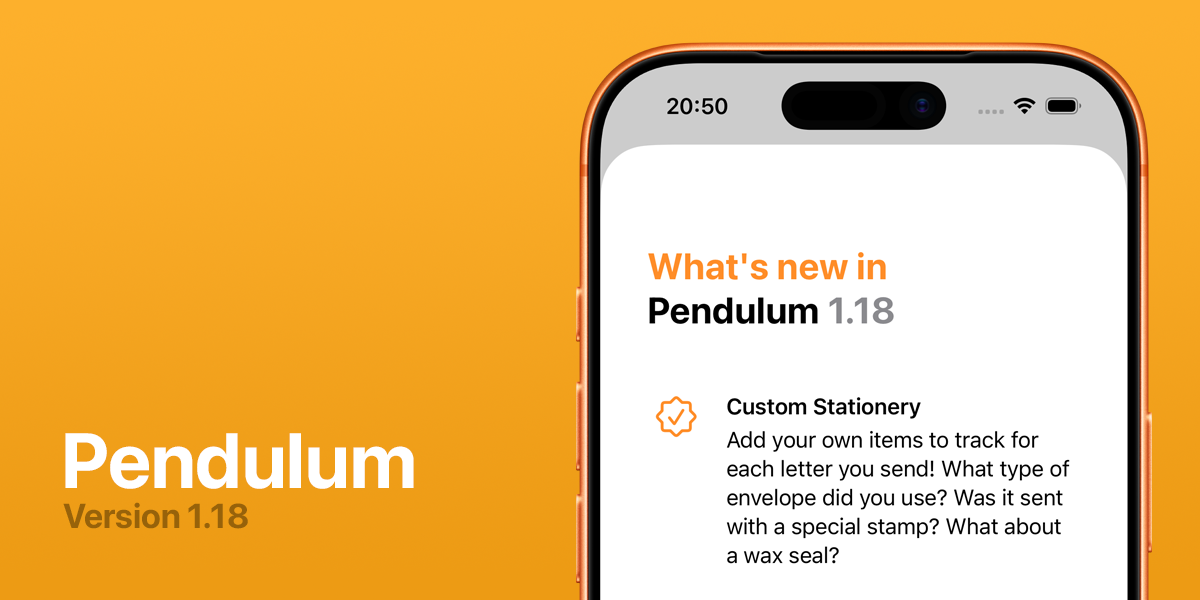
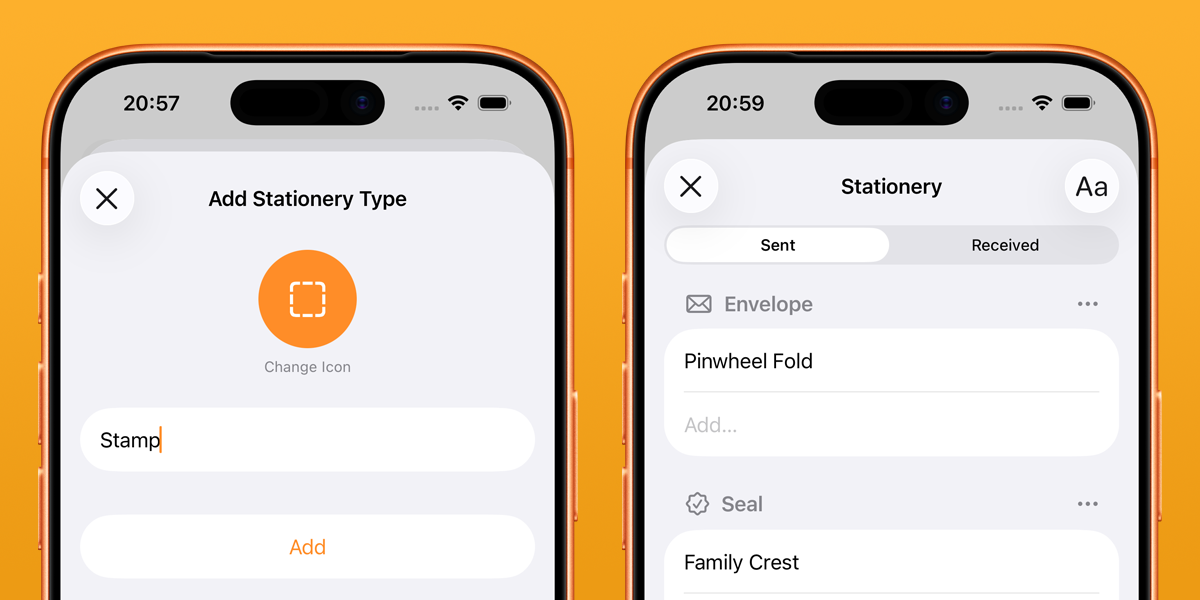
Multiple people over the last couple of years have asked for a way to track different data points about each letter they send, beyond just the pen, ink, and paper they used. The request has come in a variety of forms—some would like to track stamps, others washi tape, and others the envelope they used.
Rather than provide a limited set of options, I’ve added the ability for you to add your own categories of stationery to track, and to give each one an icon. The possibilities are endless; I’m going to be using mine to track the wax seal I used, for example. I’d love to know what others end up using it for!
Legami Friends Reference
At the airport on our way to Lisbon last year, my daughter came across a Legami gel ink pen with a little plastic unicorn clipped to the barrel, and immediately bought it. We knew of the brand, and seen other products of theirs before, but not this particular style.
A few days later, in the oldest bookstore in the world, we found a whole stand of other variants—teddies, llamas, even a panda; which she of course had to buy, as her favourite animal. From there, the collection began.
We started trying to find all the different animals we could. The ink varies in colour from pen to pen, and each animal has a little slogan on the barrel. Legami call it their Lovely Friends range, and I wanted them all!
Every time I thought we’d gotten all there were, I’d come across a one off in an independent stationery store or at the back of a corner shop, so I finally decided to actually do some research and figure out what the entire collection was.
Inspired by Robb Knight’s Mildliner’s reference, the end result of this is a new micro site I’m calling the Legami Friends reference. It includes all Lovely Friends pens (21 at the time of writing), along with their ink colour, pun-filled slogans, and details on any multipacks they’re available in or the occasion they were released for. My research led me to also include the erasable versions that feature the same Friends characters—there are a whopping 64, and many older out-of-production ones are listed for ridiculous prices on eBay.

The site lets you filter by pen type, ink colour, occasion, multipack, or character. I will endeavour to keep it up to date as new pens are released and older ones retired, and whilst I think it’s as complete as I can get it, I am sure there are some details missing. Let me know if you come across any out there!
Brickset LEGO Gift Guide - 2025
It’s that time of the year again (where on earth has 2025 gone?!) where Brickset publish their annual holiday gift guide, in five parts split by price category. Along with the other Brickset contributors, I provided my opinion, and there’s a nice diverse range of sets across the price ranges! You can view each of the articles below, along with my pick from the available choices:
Under $25
- 10349 Happy Plants
$25-$50
- 31165 Panda Family
$50-$100
- 72046 Game Boy
$100-$200
$200+
- 76457 Hogsmeade Village - Collectors’ Edition
- honorary mention of 76968 Dinosaur Fossils: Tyrannosaurus rex
What would your choices be?
Pendulum 1.15 Released
After quite some time without any updates, I have finally released a new version of Pendulum—version 1.15 is now available in the App Store!
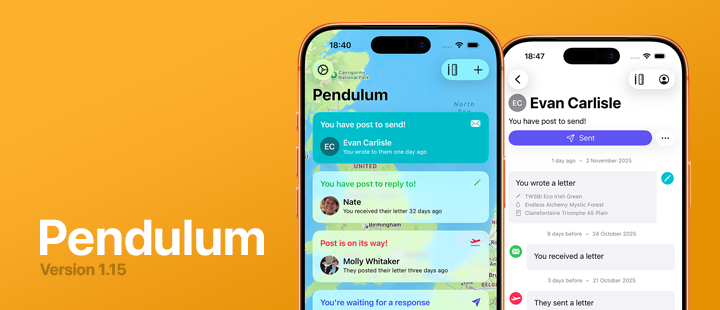
With the release of iOS 26 and it’s new Liquid Glass design language, I wanted to update Pendulum to feel more at home on the OS, and took the opportunity to change the design somewhat more drastically—at least for the main Pen Pals list. The biggest structural change was to drop the tab bar—it makes little sense when there are only two tabs—and move Settings to a top bar button. This meant I could take advantage of the new navigation transition available in iOS 26 to morph between the button and the presented sheet in a very pleasing manner.
Visually, the Pen Pal list has had a huge overhaul, with the standout change being the map in the background. This will centre itself on the location you most recently sent a letter to or received one from, and I love the way it turned out. I hope it’ll be fun for Pendulum’s users to see it pan around the world as they send and receiving their correspondence. A further update may pull the map out into its own feature, with pins for your pen pals’ locations in a more interactive manner.
Given the design now focuses rather heavily on your pen pals’ addresses, it was about time I addressed (pun intended) the inability for you to store an address against a pen pal if you’ve disabled syncing with Contacts. It’s a fairly commonly-requested feature, and this was the impetus I needed to finally get it done. Both types of Pen Pals can live happily together in Pendulum—those synced with a device contact will require you to use Contacts to update their address, and those added manually can be edited directly within the app.
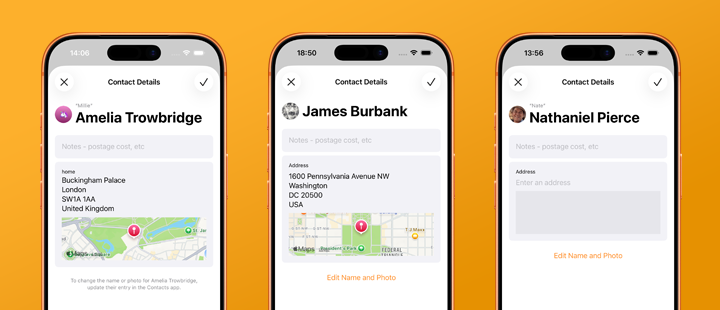
The final feature in this release can be seen in the screenshot above, in Amelia’s contact details page, Pendulum will pull in any nicknames you have against your linked Contacts, with an option to prefer nicknames over full names in most of Pendulum’s UI. Amelia will be shown as Millie in the Pen Pal list and her correspondence screen, for example.
It’s been fun to have the motivation and impetus to work on Pendulum again, and I’m excited to keep adding features and iterating as I go.
Django Forms and CSV Processing
Recently, I’ve found myself building a number of tools that accept input data in the form of a CSV from the user, and parse and validate it before executing whatever processing is necessary for the given tool. Django’s forms provide an easy way to accept file uploads, and model forms make it trivial to store those files on disk alongside a model instance.
What I was struggling with was where to do the validation of the contents of the CSV. Forms provide some level of validation, and give the user feedback via field- or form-level errors, but in order to provide useful feedback via this mechanism the form needs to parse the CSV to validate each of its rows. This is easily doable in the field-specific clean method, such as the following, which validates that every row has an identifier field and a date field, with the date in the future (using arrow for date parsing):
import csv
import arrow
from django import forms
from django.db import models
from django.utils import timezone

class CSVUpload(models.Model):
    uploaded_at = models.DateTimeField(auto_now_add=True)
    csv_file = models.FileField(upload_to="csv_uploads")

class CSVUploadForm(forms.ModelForm):
    class Meta:
        model = CSVUpload
        fields = ["csv_file"]

    def clean_csv_file(self):
        csv_file = self.cleaned_data["csv_file"]
        try:
            for row in csv.DictReader(csv_file):
                if not row.get("identifier", "").strip():
                    raise ValueError("Missing identifier")
                if arrow.get("date") <= timezone.now():
                    raise ValueError("Date not in the future")
        except ValueError as err:
            raise forms.ValidationError(f"Could not read CSV file; please ensure it is in the correct format ({err})")
        return csv_file
This works fine—the form won’t pass the is_valid() check unless the data within the CSV is valid. So what’s the problem?
Well, there’s a reason we’re reading the CSV and validating the data—we want to do something with the data. The form has parsed it, but it’s thrown away any results of that parsing, leaving the view to have to do it all over again, which is less than ideal. We can’t simply return the parsed data from the clean method, because that would break Django’s FileField handling within the model form. Instead, we can take advantage of the fact that a Form instance is just that—a standard Python object, nothing special—and set an attribute on the instance with the parsed data:
class CSVUploadForm(forms.ModelForm):
    class Meta:
        model = CSVUpload
        fields = ["csv_file"]

    def clean_csv_file(self):
        csv_file = self.cleaned_data["csv_file"]
        parsed_data = []
        try:
            for row in csv.DictReader(csv_file):
                row_data = {
                    "identifier": row.get("identifier", "").strip(),
                    "date": arrow.get("date"),
                }
                if not row_data["identifier"]:
                    raise ValueError("Missing identifier")
                if row_data["date"] <= timezone.now():
                    raise ValueError("Date not in the future")
                parsed_data.append(row_data)
        except ValueError as err:
            raise forms.ValidationError(f"Could not read CSV file; please ensure it is in the correct format ({err})")
        else:
            self.parsed_data = parsed_data
        return csv_file
Now, within the view, we can let Django handle the model form as it should, and read the form’s parsed_data attribute to use the data from within the CSV as necessary:
class CSVUploadView(FormView):
    form_class = CSVUploadForm

    def is_valid(self, form):
        instance = form.save()
        for data in form.parsed_data:
            # Use the data from the CSV, already parsed
            pass
        return HttpResponseRedirect(self.get_success_url())
Simple!
A Swift API Client
In a new app I’ve been toying with the idea of developing, much of the data comes from a third-party API. This isn’t uncommon nowadays, and there are multiple Swift packages out there to make interacting with a REST API easier, such as Alamofire. However, I wanted to build a minimal API client that I could use without relying on a third-party dependency, code that is under my control, and that I hopefully understand!
Using URLSession and URLRequest is relatively simple, but without some form of abstraction you’ll end up with a bunch of boilerplate code for each different request you need make. My goal was to build a simple, generic API client protocol that I could use for this particular API, but would also work for other use cases in the future.
So let’s get started!
The APIClient protocol
The fundamental job of an API client is to send HTTP requests to the API, and return the response. We can start by building a protocol for such a client, using the power of Swift’s Generics to accept a variety of different request objects and return a variety of different responses:
protocol APIClient {
    var baseUrl: URL { get }
    func send<T: APIRequest>(_ request: T) async throws -> T.Response
}
I’ve also added a baseUrl parameter, to allow the client to specify a single base URL for the API calls.
You’ll note that I’ve used a type I haven’t yet defined, APIRequest, so let’s do that now. A request needs a handful of properties:
- the resource the request relates to;
- the HTTP method to use;
- any querystring parameters;
- any request body;
- any custom headers.
We can define a protocol to handle these requirements:
protocol APIRequest: Encodable {
    associatedtype Response: Decodable
    var resourceName: String { get }
    var method: String { get }
    var parameters: [URLQueryItem] { get }
    var body: Data? { get }
    var headers: [String: String] { get }
}

extension APIRequest {
    var parameters: [URLQueryItem] { [] }
    var method: String { "GET" }
    var body: Data? { nil }
    var headers: [String: String] { [:] }
}
There are sensible defaults for most of these properties (such as defaulting to a GET request with no body, no parameters, and no custom headers), so an extension to the protocol can define these.
Here we also define an associated type called Response, which must be Decodable. This allows us to tie an APIRequest to a struct representing the response it expects, and is used as the return type in the function signature of send in the APIClient protocol above.
So what’s missing? The actual functionality of the send method, of course!
extension APIClient {
    func send<T: APIRequest>(_ request: T) async throws -> T.Response {
        let endpointRequest = self.endpointRequest(for: request)
        let (data, _) = try await URLSession.shared.data(for: endpointRequest)
        return try JSONDecoder().decode(T.Response.self, from: data)
    }
}
Just three simple lines:
- Call another method,
endpointRequest(for:), to generate aURLRequestobject (more on this below). - Execute the request and await the response.
- Decode that response from JSON into the request’s
Responsestruct.
This is a nice short method for a couple of reasons. First, it doesn’t do any error handling—that’s left as an exercise for the reader to decide how to handle the various possible network request errors or response decoding errors. Secondly, the conversion of the APIRequest object into a URLRequest object is handed off to another method, so let’s write that now:
extension APIClient {
    func endpointRequest<T: APIRequest>(for request: T) -> URLRequest {
        guard let baseUrl = URL(string: request.resourceName, relativeTo: self.baseUrl) else {
            fatalError("Invalid URL for resource \(request.resourceName)")
        }
        var components = URLComponents(url: baseUrl, resolvingAgainstBaseURL: true)!
        components.queryItems = request.parameters
        var urlRequest = URLRequest(url: components.url!)
        urlRequest.httpMethod = request.method
        if let body = request.body {
            urlRequest.httpBody = body
        }
        for (header, value) in request.headers {
            urlRequest.setValue(value, forHTTPHeaderField: header)
        }
        return urlRequest
    }
}
This does a couple of things:
- Adds the request’s
resourceNameto the API client’sbaseUrlto generate the full URL for the request. - Adds any parameters from the request a
URLComponentsobject based on the generated URL. - Creates a
URLRequestobject with the full URL (that will now include any querystring parameters). - Sets the HTTP method, body, and headers from the
APIRequestobject. - Returns the fully configured
URLRequest.
Now we’re ready to actually use the API client!
Using the APIClient protocol
First, we need to create a concrete class from the protocol, and define our API’s base URL:
class MyAPIClient: APIClient {
    let baseUrl = URL(string: "https://example.com/api/v3/")!
    static let shared = MyAPIClient()
}
In this example API, there are two endpoints:
/api/v3/checkKey- returns the status of the API key provided./api/v3/getKeyUsageStats- returns the usage stats of the API key provided.
In both cases, the API key must be provided as a querystring parameter called apiKey—for example, /api/v3/checkKey?apiKey=12345.
We can write the APIRequest structs to represent both of these calls:
let API_KEY_PARAMETER = URLQueryItem(name: "apiKey", value: "MY_API_KEY")

struct ExampleCheckKeyRequest: APIRequest {
    typealias Response = ExampleCheckKeyResponse
    var resourceName: String = "checkKey"
    var parameters: [URLQueryItem] = [API_KEY_PARAMETER]
}

struct ExampleGetKeyUsageRequest: APIRequest {
    typealias Response = ExampleGetKeyUsageResponse
    var resourceName: String = "getKeyUsageStats"
    var parameters: [URLQueryItem] = [API_KEY_PARAMETER]
}
Note that they both specify their associated Response types—remember, these need to be Decodable structs that can be used as the destination for the returned JSON from each API call. We can write these as follows:
// checkKey returns a JSON object with a `status` string and optional `message`
struct ExampleCheckKeyResponse: Decodable {
    let status: String
    let message: String?
}

// getKeyUsage returns a JSON object with a `status` string, an optional `message`,
// and a `matches` integer with the number of times the key has been used recently
struct ExampleGetKeyUsageResponse: ExampleAPIResponse {
    let status: String
    let message: String?
    let matches: Int?
}
With the request and response types set up, all that’s left is to add helper methods to our actual client, so that the rest of our code doesn’t need to know or understand the requests themselves:
extension ExampleAPIClient {
    func checkKey() async throws -> ExampleCheckKeyResponse {
        return try await self.send(ExampleCheckKeyRequest())
    }
    func getKeyUsage() async throws -> ExampleGetKeyUsageResponse {
        return try await self.send(ExampleGetKeyUsageRequest())
    }
}
And finally, call them!
do {
    let checkKeyResult = try await ExampleAPIClient.shared.checkKey()
    print("\(checkKeyResult)")
    let getKeyUsageResult = try await ExampleAPIClient.shared.getKeyUsage()
    print("\(getKeyUsageResult)")
} catch {
    print("Error: \(error.localizedDescription)")
}

// Prints:
// ExampleCheckKeyResponse(status: "success", message: nil)
// ExampleGetKeyUsageResponse(status: "success", message: nil, matches: Optional(2))
Simples, no?
So far, these are very simple requests, and I haven’t included much (if any!) error handling—but it feels like a good start to a simple API client interface I can use throughout my apps, with little code, and code that actually feels maintainable.
Birds and Angles: Dabbling in Django Components
The Django template language is great. It’s been one of the core pillars of Django’s popularity since the beginning—a simple, easy-to-use templating language that tries to give you just enough power to do what you need without having to think too hard.
However, there are more modern ways of thinking about template rendering that the DTL lacks: notably, support for components—splitting templates into smaller reusable chunks, that can each take their own contexts and render just what they need to. There’s always been the include tag, but it’s rather limited.
A number of third-party libraries have sprung up, such as django-bird, django-cotton, and django-components, to name just a few. Until now, I’ve never used any of them, and made do with the include tag wherever I needed to reuse a snippet of a template—however, I decided to take a look and see what all the fuss was about on a small project at work.
The design of a page I was building called for some repeated boxes displaying a couple of pieces of data for different time periods, shown below:

While this could relatively easily be done with an include, this seemed like the perfect opportunity to try one of the component libraries. I chose django-bird, as the way it functions seems to gel best with the way my brain thinks about components. I ended up with the following component:
{# templates/bird/request-stats-summary-button.html #}
{% load humanize %}

{% bird:prop period %}
{% bird:prop this_period %}
{% bird:prop active_users=999 %}
{% bird:prop totals=999 %}

<div
  class="card card-hover me-sm-3 rounded border {% if props.period == props.this_period %}bg-primary text-light{% else %}card-hover-bg-primary{% endif %}"
>
  <div class="card-body pb-2 pt-2 shadow-sm">
    <h6 class="card-title {% if props.period != props.this_period %}text-muted{% endif %} text-uppercase fw-normal">
      {{ slot }}
    </h6>
    <p class="mb-0 d-flex align-items-center">
      <i class="fas fa-user {% if props.period == props.this_period %}text-light{% else %}text-primary{% endif %} fs-5"></i>
      <span class="fs-3 ms-1">{{ props.active_users|intcomma }}</span>
      <i class="fas fa-mouse-pointer ms-3 {% if props.period == props.this_period %}text-light{% else %}text-primary{% endif %} fs-5"></i>
      <span class="fs-3 ms-1">{{ props.totals|intcomma }}</span>
    </p>
  </div>
</div>
You’ll notice the use of four “props” to pass data through, as well as the {{ slot }} variable to capture the contents of the component. I updated the main template to use the component:
{% bird request_stats_summary_button period=period this_period="today" active_users=active_users.today totals=totals.today %}
  Today
{% endbird %}
{% bird request_stats_summary_button period=period this_period="this_week" active_users=active_users.week totals=totals.week %}
  This Week
{% endbird %}
{% bird request_stats_summary_button period=period this_period="this_month" active_users=active_users.month totals=totals.month %}
  This Month
{% endbird %}
{% bird request_stats_summary_button period=period this_period="this_year" active_users=active_users.year totals=totals.year %}
  This Year
{% endbird %}
And it worked great!
I originally picked django-bird because I liked how it used standard DTL tags, and didn’t require any custom template parsers. However, in actual use, I don’t like that I can’t wrap DTL tags to multiple lines, which ends up with the bird lines quickly becoming unwieldy. There’s a forum post and ticket about supporting new lines in DTL tags, but that won’t happen any time soon.
This is where another new-to-me package comes in—dj-angles! The main purpose of this package is to provide a web-component-style template tag interface to the built-in DTL template tags, as demonstrated quite neatly in their docs. This is done by adding a new template loader that parses the alternative syntax. However, what’s of interest to me is that they also provide native integration with django-bird, allowing us to use the more compact (and new-line-compatible!) style tags with bird components.
A couple of settings later, and we can reference the above components in a way that really seems to click for me:
<dj-request-stats-summary-button
  period=period
  this_period="today"
  active_users=active_users.today
  totals=totals.today
>
  Today
</dj-request-stats-summary-button>
<dj-request-stats-summary-button
  period=period
  this_period="this_week"
  active_users=active_users.week
  totals=totals.week
>
  This Week
</dj-request-stats-summary-button>
<dj-request-stats-summary-button
  period=period
  this_period="this_month"
  active_users=active_users.month
  totals=totals.month
>
  This Month
</dj-request-stats-summary-button>
<dj-request-stats-summary-button
  period=period
  this_period="this_year"
  active_users=active_users.year
  totals=totals.year
>
  This Year
</dj-request-stats-summary-button>
It’s more verbose in number of lines, but much more readable!
Yes, I’m aware that this is the sort of thing that django-cotton and other template libraries provide automatically, but I’ve come to quite like django-bird. Perhaps I’ll swap to one of the others one day, but for now, I’m enjoying what the combination of birds and angles can give me.
There’s only one main issue I have with django-bird, and that’s how it doesn’t parse DTL filters in values passed as properties or attributes. For example, the following component reference:
{% bird button badge_count=users|length %}Users{% endbird %}
will result in the badge_count prop inside the button component being set to the string "users|length", which is not the desired result at all. I have an open issue and associated draft PR on the repo, so hopefully we’ll be able to get the feature into the library before too long.
Brickset LEGO Gift Guide - 2024
Once again Brickset have published their annual holiday gift guide, in five parts split by price category. Huw asked for my opinion, along with the other Brickset contributors, and I think most of us made some pretty good choices! You can view each of the articles below, along with my pick from the available choices:
- Less than $25 - 31147 Retro Camera
- $25-$50 - 31154 Forest Animals: Red Fox
- $50-$100 - 43249 Stitch
- $100-$200 - 31212 The Milky Way Galaxy
- $200+ - 10326 Natural History Museum
What would your choices be?
